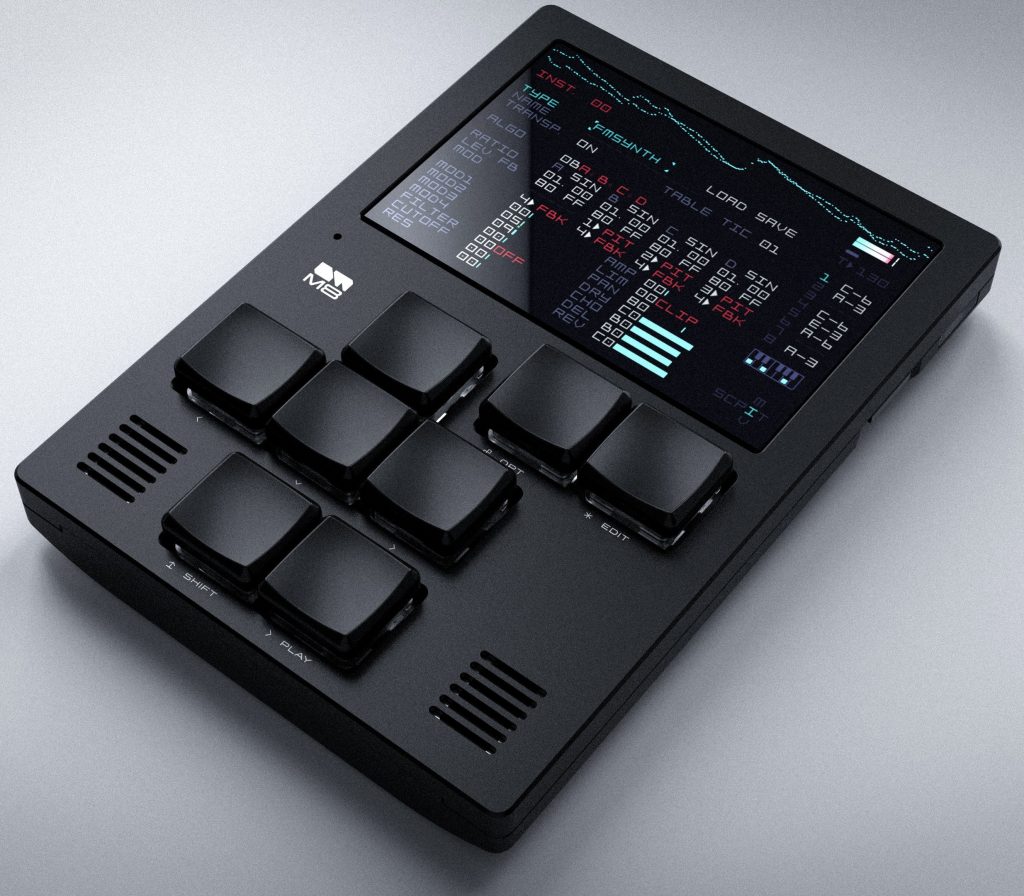
Take a Teensy 4.1 hobbyist board, a somewhat under-utilised SteamDeck, a cheap third-party ‘macro’ keyboard and boom! My own variation on the ‘Headless DirtyWave M8’ bandwagon.
A long time ago, around the time of the legendary ‘Bat-Pack’ Amiga A500 bundle, I was introduced to either SoundTracker or ProTracker (I forget which, to start with) at a mate’s house. A few days later I acquired a set of a half-dozen floppies, ST-00 to (possibly) ST-04… and this was a bootable disk with ProTracker and some modules, and a few disks of samples. It was nothing short of horizon-expanding.
My favourite composer was a guy called 4Mat – he provided music for some Amiga demogroup productions and probably other things too, and one of my greatest joys was to find a module I really liked, ‘rip it’ out of memory or off a disk, and discover in the sample name ‘comments’ that it was another quality 4Mat production.
Anyway, more recently I found myself using VortexTracker on the PC to put some ‘in the style of’ type tunes in a Spectrum Next retro game I’ve been working on.
The YouTube algorithm being what it is, at some point in recent weeks I’ve stumbled across the DirtyWave M8 handheld tracker, and the ‘Headless’ sub-group. The tracker is a labour of love from a incredibly talented chap in the US, and is made in small (and understandably expensive) batches. The ‘Headless’ is where he’s allowing his firmware (the built-in software on the tracker) to be downloaded and installed onto a specific kind of hobbyist computer… and by pairing that up with a suitable donor screen, keyboard and speakers, you can create much of the DirtyWave M8 experience for a substantially lower outlay (though you don’t get the gorgeous form-factor, obviously).
Putting Together An ‘M8 Headless’
I’d idly wondered about making one, the off-putter to me was that I would need to buy one of those modern ‘handheld’ consoles. If you sort out the Teensy part, then you can actually use a normal computer (laptop, whatever) to be the host for the input/output stuff, but I liked the idea of the portability of it all, and if the software only uses 8 buttons, then even my reduced-keyset 87-key keyboard has 79 more keys than I actually need…
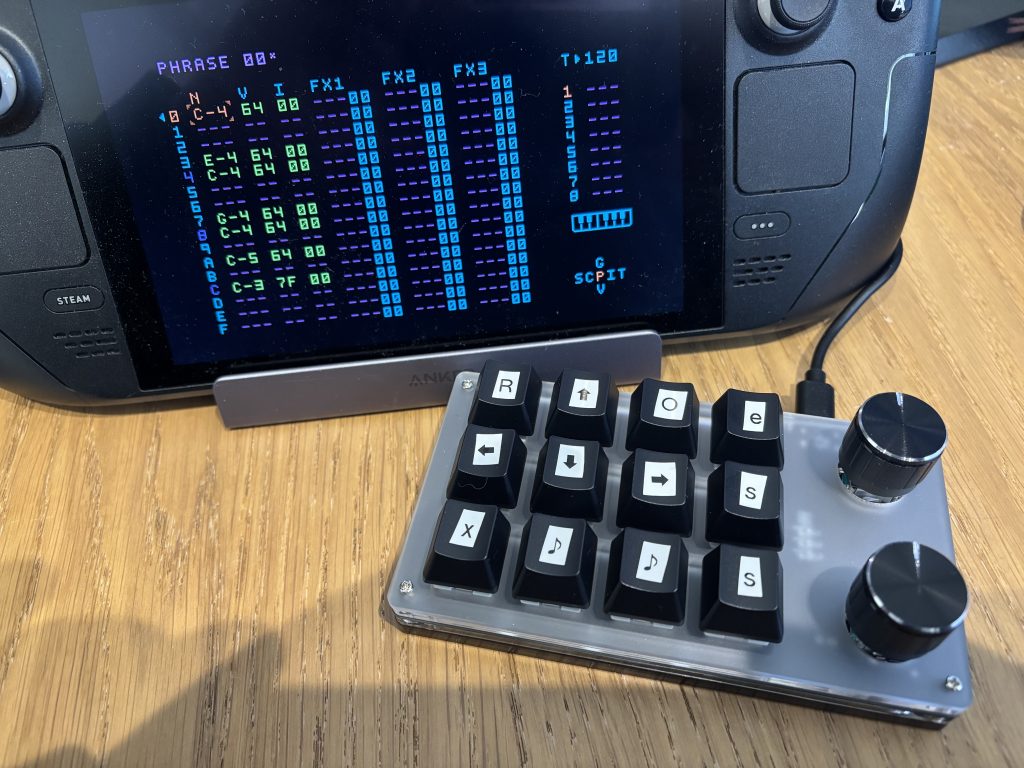
This didn’t really go anywhere for a few days until I read a fateful Reddit post about using a SteamDeck to be the host. I have a SteamDeck handy, it doesn’t get the use it should because unfortunately these days gaming is a lower priority for me, so I followed some very simple steps and within about 15 minutes I had the M8 software running on the SteamDeck. I say running – I had a few keyboard mapping issues, all of which you do get pre-warned about in the SteamDeck M8 Headless repo, but after a few further minutes of fettling it was happily working.
And then I realised – it needed to have a clicky keyboard. It needed to have an external keyboard, preferably with only just enough buttons. To get an experience closer to the real thing (although admittedly still light years from the actual real thing), I’d need a keyboard.
Well, you can pick up random no-brand USB keyboards from Amazon easily enough. I could have spent more money on a wireless or BT-enabled one, but you have to draw the line on a project ‘spend’ somewhere and I drew the line at the cost of the keyboard. I picked one that looked like it might be suitable – it was about 20 quid, which isn’t even 2 lots of fish and chips these days.
When it arrived, the keys were simply mapped A-L, and at first I remapped the SteamDeck controller settings and the M8 ‘runner’ software over to the keys that the software was expecting (cursors, Z, X, A, S etc). This seemed to be janky, although I wouldn’t rule out the problem was between the keyboard and the chair, and in the end I downloaded the possibly-compromised dodgy software tool, from the keyboard manufacturer, to reconfigure the keypad so that it was sending out the correct keys for the M8, without needing anything in the SteamDeck controller layer or in the M8 runner software’s settings.
This seemed to do the trick, it’s been solid ever since. The one thing that can be a bit janky is if you choose to flip from the audio coming out the SteamDeck speakers, to the audio coming out of the headphone socket (like, to an external mixer or monitors). Doing that seems to upset the whole setup and from that point on there seems to be a short lag between triggering a sound and the sound coming out. The trick when that happens is just to restart the runner software, then all is well.
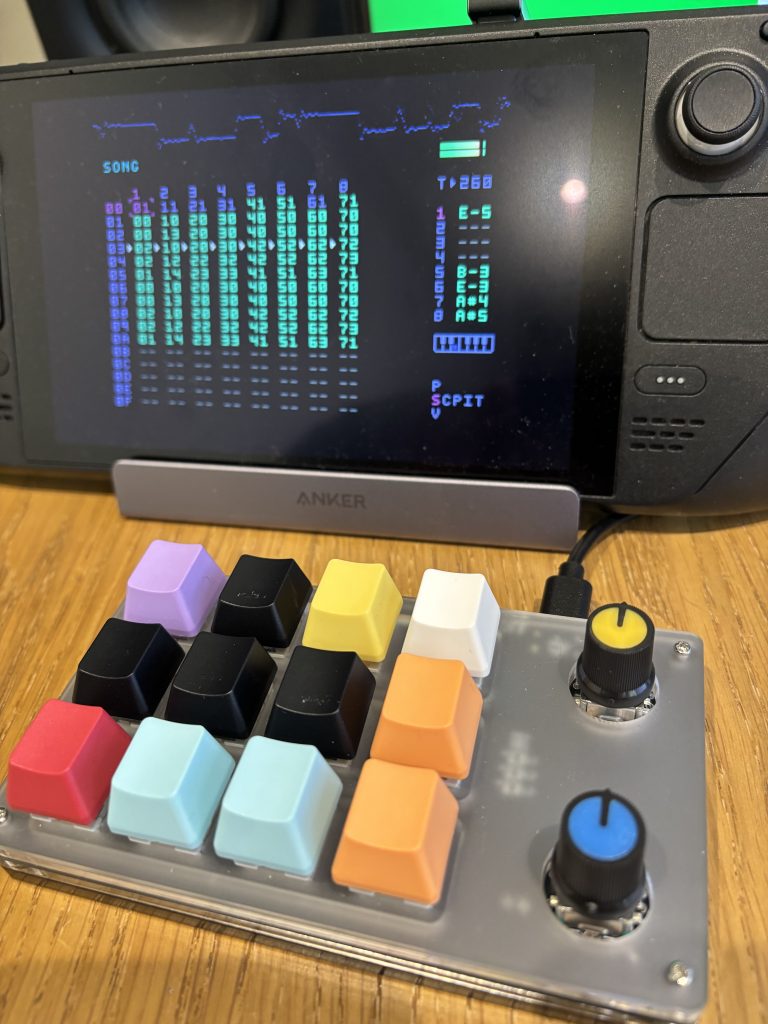
I’ve had a couple of iterations with the keycaps. The keyboard came with plain black caps, and I put some shoddy temporary Dymo labels on each key. But it looked bad, and when I realised you can buy a small set of keycaps for buttons, ha ha, I just got some coloured ones. The different colours represent different functions. I kept the black ones for the ‘cursor’ keys because they’re slightly different to the coloured ones, in terms of size and texture), and I found that this set-up meant there was a pleasing tactile sense of which keys your fingers were over, even when your hand was obscuring the pad.
Of course, the proof of the tracker is in the derivative EDM that you toss-out as an example project, and so you can expect that to arrive here very shortly.
Sorry.
Other people have described the process of the Teensy 4.1 M8 side of things better than I ever could, so the links at the bottom include that – treat that as your starting point, and a Teensy in the UK right now will set you back around 40-50 quid. Amazon have them, but if you are patient and shop around you can find them cheaper I think – certainly, it should be a wee bit less, but unfortunately we live in interesting times. Once you have the Teensy ‘flashed’, you can test it using any bog standard Mac/Windows box etc, and it might be that you never feel the need to go beyond that. You’ll also need a modern microSD card as storage for the Teensy (samples, instruments, songs etc).
The SteamDeck software requires mild wrangling to get going, but nothing beyond anyone’s capabilities if you approach it calmly and read the instructions once or twice before starting out. I liked the option of running the ‘m8c’ software, rather than using the M8 downloaded website option – but both are linked below.
Finally, the keyboard came from Amazon but you could probably do better, cheaper on AliExpress etc. I picked a 12-key clicky (knock-off Cheery Blues I think) with LEDs and a couple of (largely ornamental) potentiometers. If you find a better option then let me know, I’d be interested in what else is out there (really, you want 8 keys for the M8, and then a shortcut key for Delete, and maybe a shortcut key for ‘refresh screen’, and then in my experience a ‘spacebar’ can be handy too – so a 10 or 11 key pad would be just as good).
The SteamDeck is the SteamDeck of course, and you might not have one just kicking around, so I’ve also linked a few of the YouTubes and sites where the more obvious alternatives are shown – the TrimUI Brick and the Andermic RG35 range of consoles seem to be the standard choice.
How to use the M8 itself? There are lots of great YouTubes below to get you started, and if I ever make more than a couple of tracks with mine I will show my own workflow because that’s a very male-hobby, podcasty kind of mansplaining thing to do I guess, isn’t it?
I’m sure you’ll be enthralled.
Links
https://dirtywave.com/ – The Official DirtyWave Website
https://m8.run/ – Allows you to ‘host’ a M8 board connected to a laptop/desktop etc
https://github.com/Dirtywave/M8HeadlessFirmware – Precompiled M8 Firmware for Teensy 4.1 board
https://github.com/roterodamus/steamdeck-m8c – software to host the M8 Teensy board on a SteamDeck
https://amzn.eu/d/0io3BS7H – Amazon UK Link for basic Teensy 4.1 board
https://amzn.eu/d/0gusI7Rz – Amazon UK Link for ‘macro’ USB keyboard
https://amzn.eu/d/0azjdWBM – Amazon UK Link for cheap coloured keycaps
https://samplesfrommars.com/ – some free (and paid-for) samples
https://github.com/v3rm0n/awesome-m8 – great repo of M8 resources
https://m8them.es/ – M8 Themes
https://cowtonguetacorecords.bandcamp.com/ – Some great M8 Tracker releases here
https://www.youtube.com/@RedMeansRecording – great YouTube channel, lots of M8 info & tutorials
https://www.youtube.com/@StephenMcLeod – AllMyFriendsAreSynths (YouTube) – more M8 goodness
https://www.youtube.com/@Aisjam/playlists – AisJam (YouTube) – M8 tutorials